


Foundation Friday: Downward Facing Dog
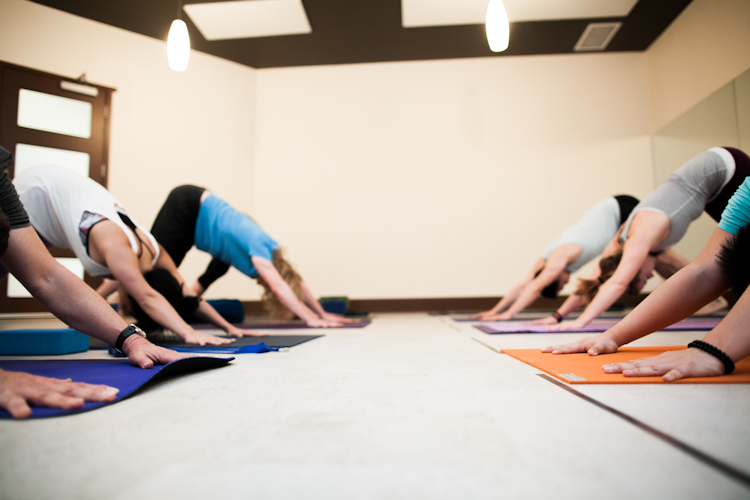
This post is an instalment in a series that delves into the basics of yoga—looking at its postures (asana), breath (pranayama), philosophy, and all the other essentials—giving you the foundations upon which to build a solid practice. This post focuses on the ubiquitous downward facing dog.
Foundation Friday: Downward Facing Dog
Pose, or "Asana" Downward Facing Dog, or “Adho Mukha Svanasana” odd-oh mook-ah shvah-nass-ah-nah (not to be confused with savasana)

Why do we practice downward facing dog?
Downward dog is probably one of the most prevalent of all yoga postures. Though it may not feel like one when you first begin practicing, downward facing dog is actually a resting pose, and is often offered as a break between sequences, or as a starting and finishing point in a flow, or vinyasa. This pose will likely be taught in your first-ever beginner's class, and will carry you through as you advance your practice—downward dog is a quintessential pose, so it's important to get your alignment, er... down!
Downward dog may help…
- Calm the mind, relieving stress and mild depression
- Energize your body
- Stretch your shoulders, hamstrings, calves, arches, and hands
- Strengthen your arms and legs, which acclimatizing you to weight-bearing in your arms
- Improve digestion
- Offer relief for sinus pain, headaches, insomnia, back pain, and fatigue
- Ease conditions of menopause, high blood pressure, asthma, flat feet, and sciatica, and prevent osteoporosis
Traditional Chinese Medicine and acupuncture tend to favour Downward Facing Dog for its activation and extension of the Bladder Channel, the longest channel in the body. According to their perspective, elongating the spine throughout this posture aids in strengthening immunity, among a host of other benefits.

How do I get there?
- Start from a table top position, on your hands and knees. Place your hands slightly wider than shoulder distance apart and spread your fingers wide.
- Turn your hands so that the space between your pointer finger and your middle finger points to the top of your mat.
- Press down through the four corners of your hands, especially the mound of your thumb and pointer finger, while gripping your mat with your fingertips.
- Tuck your toes under, and press your hips up so that your body looks like an inverted pyramid from the side.
- Squeeze your forearms towards each other, and roll your upper arms away from each other.
- Ensuring your feet are hip-distance apart, take a soft bend into your knees and press your heart back towards your thighs.
- Roll your inner thighs back and wide behind you.
- Tilt your sitting bones skyward, and draw your tummy in towards your spine.
- Hug your shins towards each other, and press your heels down towards your mat (but it's okay if they don't touch!)
- Look between your feet, shins, thighs, or upwards at your belly.
If this position is uncomfortable, you can:
- Place your hands on blocks if your shoulders are quite tight
- Prop a towel, rolled mat, or some small sort of padding underneath your palms to alleviate pressure on your wrists
- Take a bigger bend into your knees if your legs are tight
- Support your head with a bolster or a block
- Or, start from standing with a wall or chair in front of you, then bend at your waist and press your palms into a wall or chair instead of the floor. Progress by walking your hands lower towards the earth as the posture becomes more accessible.
We hope this helps you better understand the concept of downward facing dog. Please feel free to comment on our Facebook with any further questions. And let us know if you have something you would like to see featured in Foundation Friday!

Foundation Friday: Drishti

 Zoran's drishti aids in his balance and concentration.
Foundation Friday: Drishti or Gazing Point
Drishti (meaning: "full seeing", vision, point of view, intelligence or wisdom)
Pratyahara: sense withdrawal
Dharana: concentration
drish-tee
"The eyes play a predominant part in the practice of asanas." - BKS Iyengar
Drishti, or focused gaze, is a means for developing concentrated intention. It relates to the fifth limb of yoga concerning sense withdrawal, as well as the sixth limb dharana relating to concentration. There are a total of 9 drishtis and each yoga asana is associated with one. There are many yoga systems that use this practice and differences regarding which are used for specific asanas, but drishti is mainly part of the Ashtanga Yoga, Hatha Yoga, Bhakti Yoga and Raja Yoga traditions.
Why do we practice drishti?
Focusing your gaze as specific points allows your concentration and intention to flow in a circular manner. The gaze first comes from within and is then directed outward to a specific point. This intense focus creates an energy that is reflected back into your body to hold your concentration. This allows the 'looking' to reflect inward, creating a withdrawal of the outward senses and a connection to Self. The directed gaze also gives the mind a focused visual stimulus; wherever your eyes go your mind will follow. Drishti allows the mind to be singularly focussed and balances our internal and external practice. In a visually addictive world, our attention is like currency. Spend it wisely!
Drishti may help...
- concentration
- inner connection
- posture alignment
- meditation
- cleansing the mind

In Urdhva Mukha Svanasana (Upward-Facing Dog Pose), for instance, we gaze at the nose tip: Nasagrai Drishti. In meditation and in Matsyasana (Fish Pose), we gaze toward the Ajna Chakra, the third eye: Naitrayohmadya (also called Broomadhya) Drishti. In Adho Mukha Svanasana (Downward-Facing Dog Pose), we use Nabi Chakra Drishti, gazing at the navel. We use Hastagrai Drishti, gazing at the hand, in Trikonasana (Triangle Pose). In most seated forward bends, we gaze at the big toes: Pahayoragrai Drishti. When we twist to the left or right in seated spinal twists, we gaze as far as we can in the direction of the twist, using Parsva Drishti. In Urdhva Hastasana, the first movement of the Sun Salutation, we gaze up at the thumbs, using Angusta Ma Dyai Drishti. In Virabhadrasana I (Warrior Pose I), we use Urdhva Drishti, gazing up to infinity. In every asana, the prescribed drishti assists concentration, aids movement, and helps orient the pranic (energetic) body.
In some cases, an improper drishti can actually be harmful, like shoulderstand where the head should not turn to look left or right. Keep this in mind when working with drishti in your practice.
Let the drishti be your guide in to the unseen, to your source, your truth. Allow the flow of your gaze bring you into your true balance and nature.

Foundation Friday: Trikonasana


These Yogalifers are feeling the length in Louise McKinney Park!
Foundation Friday: Trikonasana || Triangle Pose
Utthita Trikonasana (extended triangle pose)
trikona: triangle asana: posture or seat
Ooh-tee-ta Trih-koh-nah-sah-nah
Trikonasana is one of those foundational poses that gets extra juicy with technical alignment and a longer hold. With that said, there are many ways and cues to get you into this pose, and as we always say, the best version is the one that feels the best. Strength and length are at the heart of triangle pose; feel grounded in your lower limbs and lengthened in your torso out to your fingertips.
Why do we practice Trikonasana?
Like Pranayama and meditation, we can think of our physical postures as medicine. Here are some of the benefits of triangle pose:
- improves the flexibility of the spine
- corrects alignment of the shoulders
- relieves backache
- soothes intestinal issues including gastritis, indigestion, acidity and flatulence
- massages and tones the pelvic organs
- corrects the effects of faulty posture and a sedentary lifestyle
- assists stiffness in the neck, shoulders and knees
- strengthens the ankles and tones the ligaments of the arms and legs
- improve appetite, digestion and circulation
- tone the spinal nerves and abdominal organs
- tone the reproductive organs
- stimulate the nervous system

How do we get there?
There's a lot going on in this pose: you are stretching your hamstrings and psoas, activating and lengthening the external and internal oblique muscles, and the aligning your shoulders as you engage and strengthen the rhomboids (those muscles between the scapulae). Not to mention all the internal medicine you're receiving simultaneously...!
So, from the ground up:
Turn your back toes to face the long edge of your mat, perhaps turning them in slightly depending on sensations in your knee.
The front foot is facing the short side of your mat.
You may use heel-to-arch alignment if it feels right or choose a wider stance based on what's right for your body.
Engage the inner thighs as if you're trying to bunch your mat in the middle.
Draw the pelvic floor up and simultaneously draw in and spin the bottom low belly toward the ceiling.
Spin the entire rib cage up as well.
Ideally, the hips are square to the long side of your mat, with the top hip point (the iliac crest) rolling up and open to the ceiling, the bottom hip rolling under. This will help to square the hips, but if the psoas is tight (and you may feel that tightness in the hamstrings, as the contraction of the psoas here draws on the hamstrings’ origin point), it may take time.
You can use a block under your hand and always remember to take a soft bend in your knees if that's what's feeling best. Never lock them out or hyper-extend!
Keep space in the lower-side oblique muscles so that you’re not collapsing through that lower side waist; keep it long and engaged. Think equal length in both sides of your waist, continuing with that length into your neck and right out your fingertips.
You may choose to gaze up to your top hand or simply look where it feels natural.
Keep your breath long and deep, pulling it in and expanding through the diaphragm to contract and tone your digestive organs and keep focus.
Be sure to come out of this pose on the inhale, engaging the abdominals to help you rise without stressing the lumbar spine. Choose muscle over momentum. Breathe. Switch sides!

Foundation Friday: Sama Vritti Breath


Yogalifer Amy Stuparyk shows us you can literally practice this breath anywhere!
Foundation Friday: Sama Vritti Breath
Pranayama (meaning: to restrain or control life force) Sama Vritti or Equal Breath (Sama = even, smooth, flat, equal or same, Vritti = fluctuations or modifications)
sa-ma vree-tee
Why do we practice Sama Vritti breathing?
As the saje Patanjali teaches, we practice yoga asanas and meditation to calm or smooth the fluctuations of the mind (yoga-chitta-vritti-nirodhah). This same principle can apply to sama vritti pranayama—smooth, equal breaths to inspire a calm mind. As the name suggests, the purpose of sama vritti is to create a steady, equal rhythm to create a quality of 'sameness' or balance in the flow of consciousness. Pranayama—or breathwork—is one of the eight Limbs of Yoga (more on those to come!) and can be practiced on its own, or alongside asana (postures).
Sama Vritti may help...
- distractions of the mind
- anxiety
- heart rate
- flow of consciousness
- general focus and attention
- achieving a meditative state
- steadiness in our seated and asana practice
How is it done?
Pranayama often fixes a ratio between the length of each inhale and exhale. In sama vritti pranayama, the ratio is equal. It is a good idea to begin the practice of sama vritti pranayama in the reclining position and then continue by moving on to a seated practice.
To engage sama vritti pranayama, try restricting your breath to an even count on both the inhale and exhale, for example: an inhale = 4 counts, and an exhale = 4 counts. Continue with this pattern.
You can increase the number of counts for each inhale and exhale as you feel comfortable, enjoying the longest pattern you can sustain! Remember to take your time and stay steady with the counts. Notice the way your body, mind, and spirit feels quiet and calm after a sama vritti pranayama practice.... and then carry this with you throughout your day!
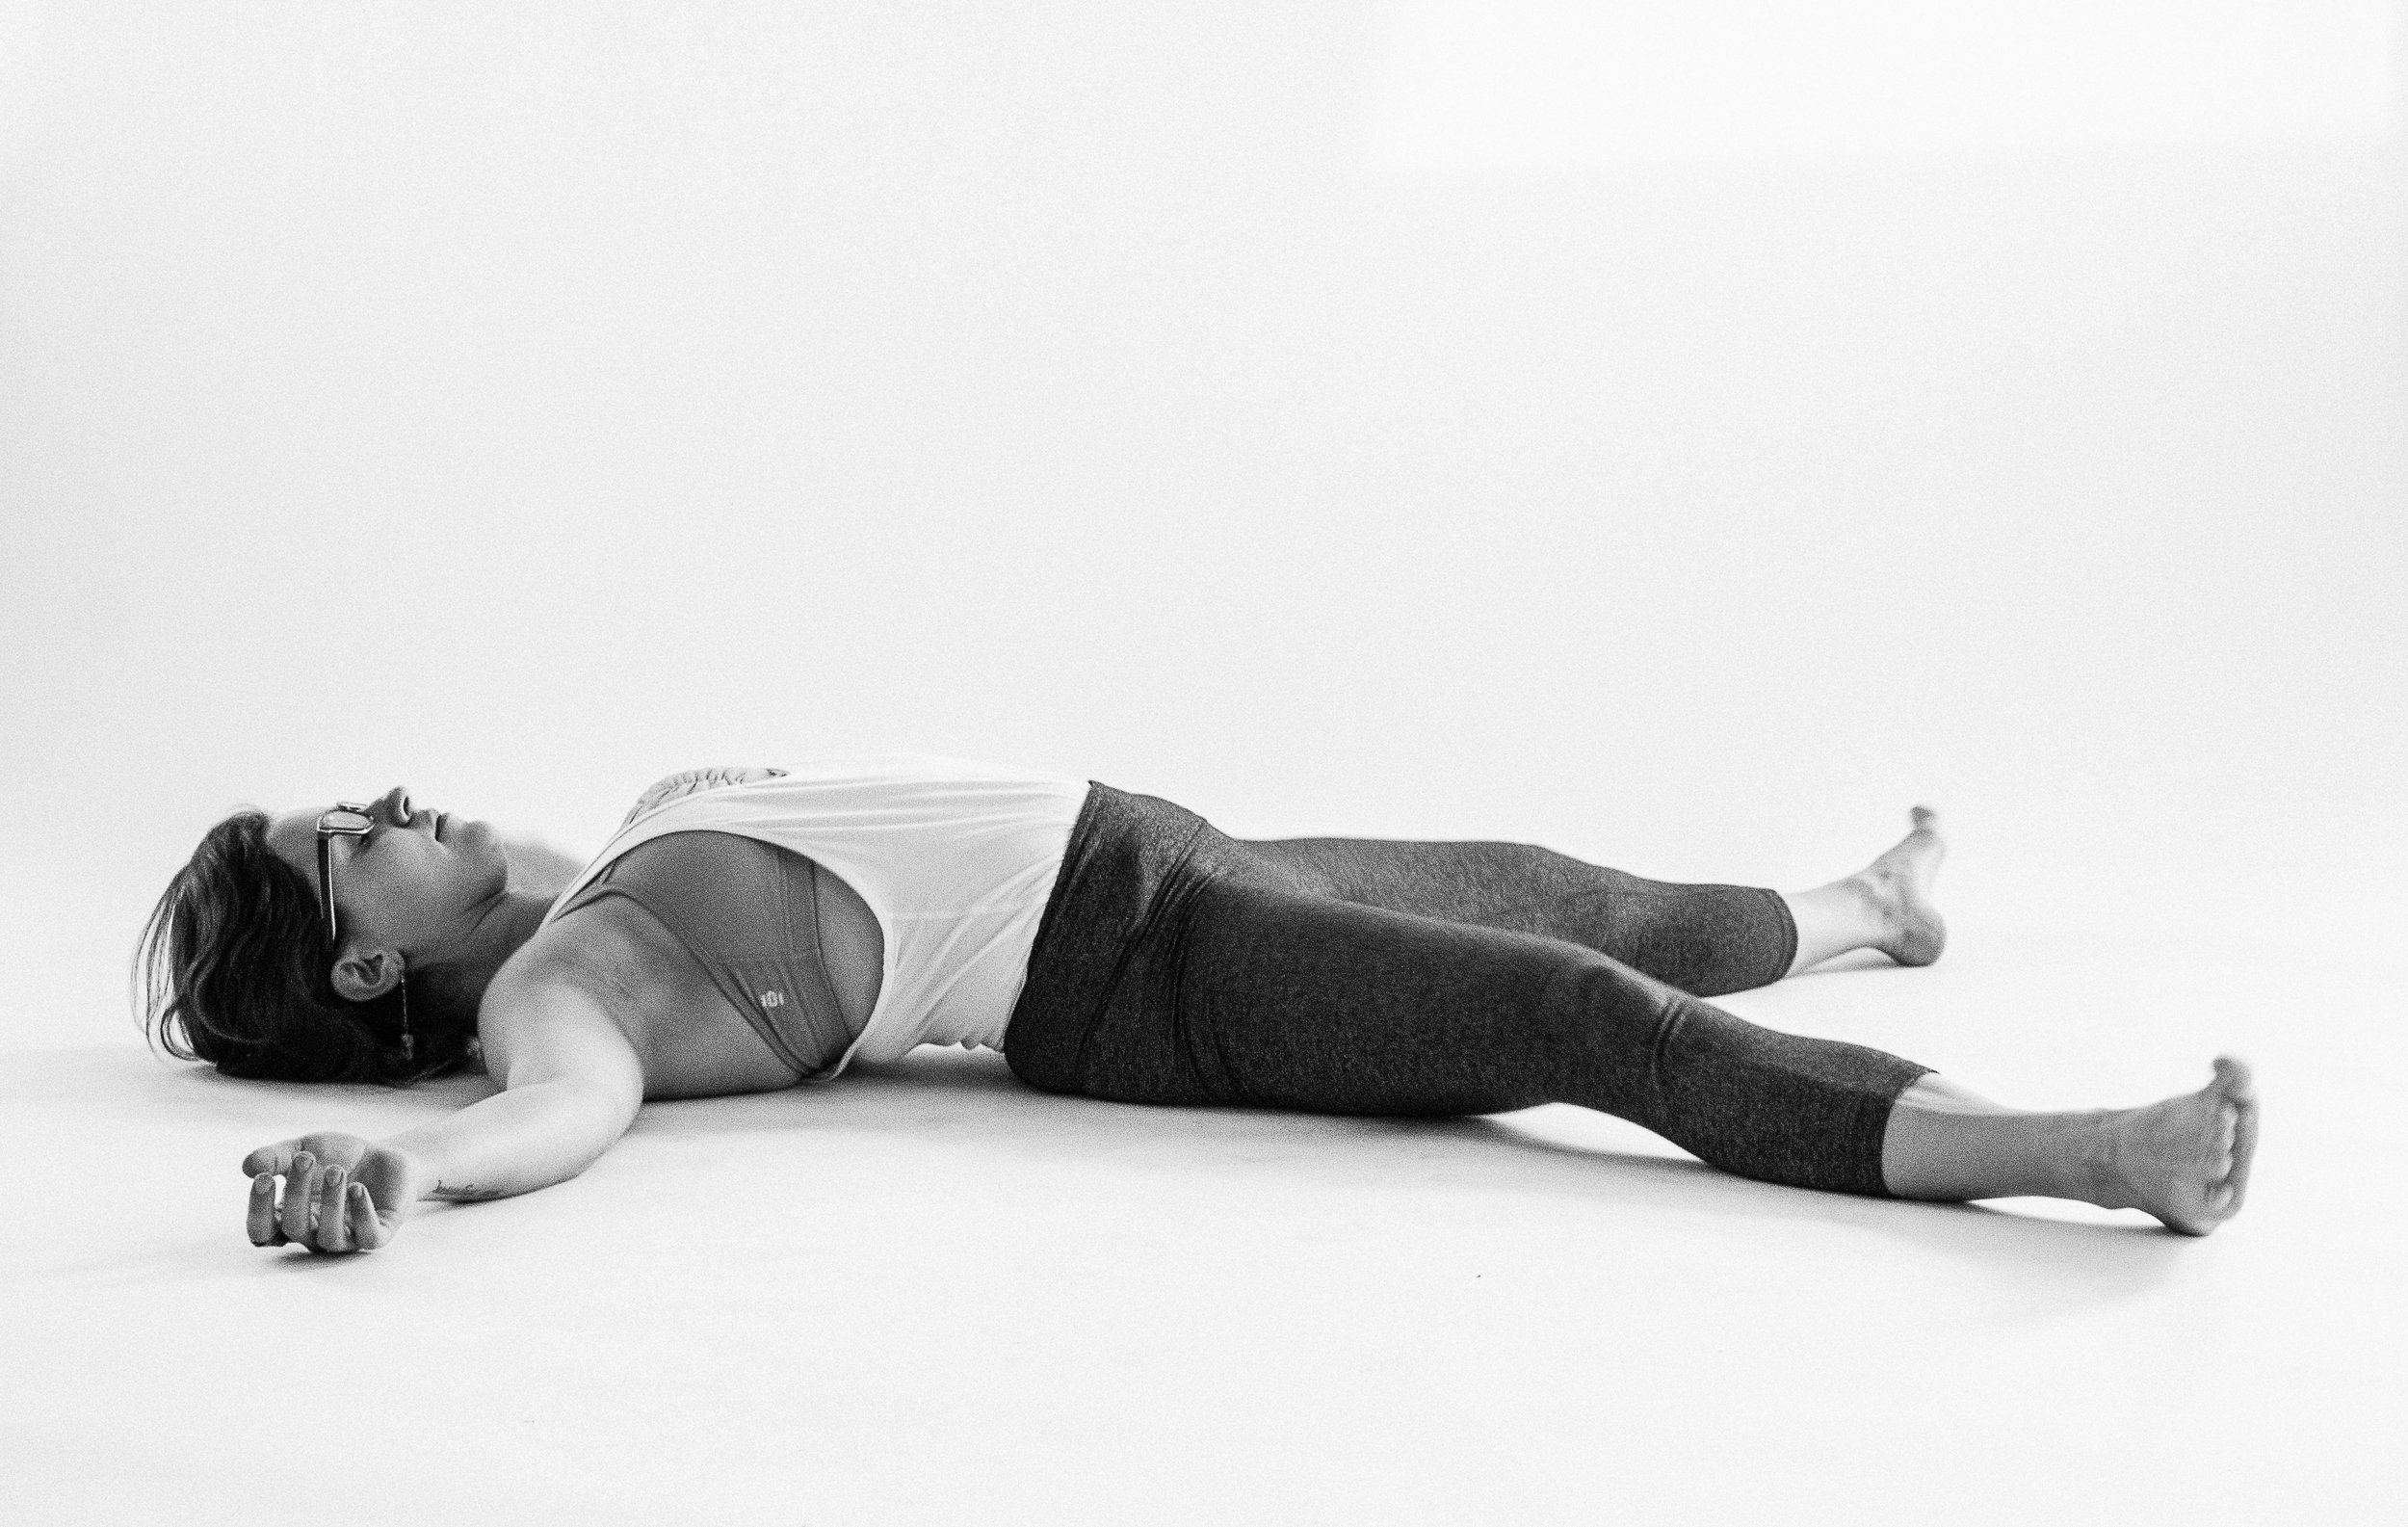
Foundation Friday: Savasana

This post is the first in a new series that delves into the basics of yoga—looking at its postures (asana), breath (pranayama), philosophy, and all the other essentials—giving you the foundations upon which to build a solid practice. First off, we’ll be taking a look at the quintessential yoga asana, or pose—savasana.
Foundation Friday: Savasana
Asana
Corpse Pose, or “Savasana”
(sava=corpse, asana=pose)
sha-vass-a-na

Savasana is the most important—and perhaps, the most difficult—pose in yoga. While it may appear that someone in savasana is simply setting up for a nap, the goal is not actually to fall asleep—rather, savasana intends to mimic the restful effects of sleep by rejuvenating the body, mind, and spirit while the practitioner remains conscious. Since we are not distracted by sensory sensation in this restful position, we are perfectly prepared to lie in quiet awareness of our breath, of our mind, and our humble presence. Without attaching any judgment on to our pattern of breath or to any thoughts that may arise, we may simply be conscious of them.
Why do we practice savasana?
Savasana is a perfect place to pause and find some peace before yoga, to settle our minds and bodies, to get ourselves into a quiet space, setting the tone for our practice. After asana practice, it is so important to take savasana—savanasa is where our bodies make sense of everything that happened throughout practice. This is the time that we can integrate any new sensory information throughout our bodies—where we can soak up all the goodness of practice and let it sink in. It is also an exercise in calming the nervous system, and just like any muscle in our body, the more we can train our brains to find quiet—to slow down and simply notice things the way they are—the stronger our brains and nervous systems will be at mimicking the same quiet, stillness, and calm throughout the rest of our lives.
Savasana may help…
• Decrease your heart rate • Lower your blood pressure • Alleviate muscle tension • Lessen anxiety • Heighten your ability to concentrate or focus • Increase your energy levels

How do I get there?
- First, lie on your back. Lay your feet outstretched from your body about hip-width distance apart, with your arms outstretched a few inches away from your side body, palms face up.
- Let your toes relax to the sides (your feet may rotate outwards slightly).
- Slightly tuck your tailbone under to lengthen your spine.
- Tuck your shoulder blades underneath your body to open across your chest.
- Slightly tuck your chin in to keep the back of your neck long.
- Close your eyes.
- Relax and soften everywhere that you can in your body.
- Release any breathing technique you may have been using in class—breathe naturally.
***Note: comfort is essential in savasana—find whichever variation of savasana is the most relaxing to you, so that it will be easier for you to avoid distractions.
If this position is uncomfortable, you can:
- Keep your upper body the same, but bring the soles of your feet together and let your knees fall wide
- Place the soles of your feet mat-width distance apart and rest your knees together (helps if you are experiencing lower back discomfort)
- Place a bolster under your knees (also helps with lower back discomfort)
We hope this helps you better understand the concept of savasana. Please feel free to comment with any further questions. And let us know if you have something you would like to see featured in Foundation Friday!
Categories
- Wellness 248
- Zen Habits & Inspiration 101
- Injury Prevention & Health 30
- Classes 1
- Yogalife Classes 7
- Prop Specific 1
- Studio Information 19
- Foundation Friday 25
- Physical Health 3
- Yoga Specific 55
- Curated Playlists 2
- Recipe 11
- Karma Program 5
- Staff Adventures & Journeys 12
- Anatomy & Information 30
- Community Event 19
- YEG Highlight 8
- Instructor Stories 22
- Yogi of the Month 14
- What's Going On 39
- Yogalife Workshops, Retreats & Trainings 41
- Relaxation 1
- Mental Health 2
- Workshops 37
- Registered Classes 4
- Pregnancy & Family 1
- Member Stories 6