


Foundation Friday: Balasana
This post is yet another instalment in a series that delves into the basics of yoga—looking at its postures (asana), breath (pranayama), philosophy, and all the other essentials—giving you the foundations upon which to build a solid practice. Today's posture is another great addition to our Grounding Series.
Foundation Friday: Balasana
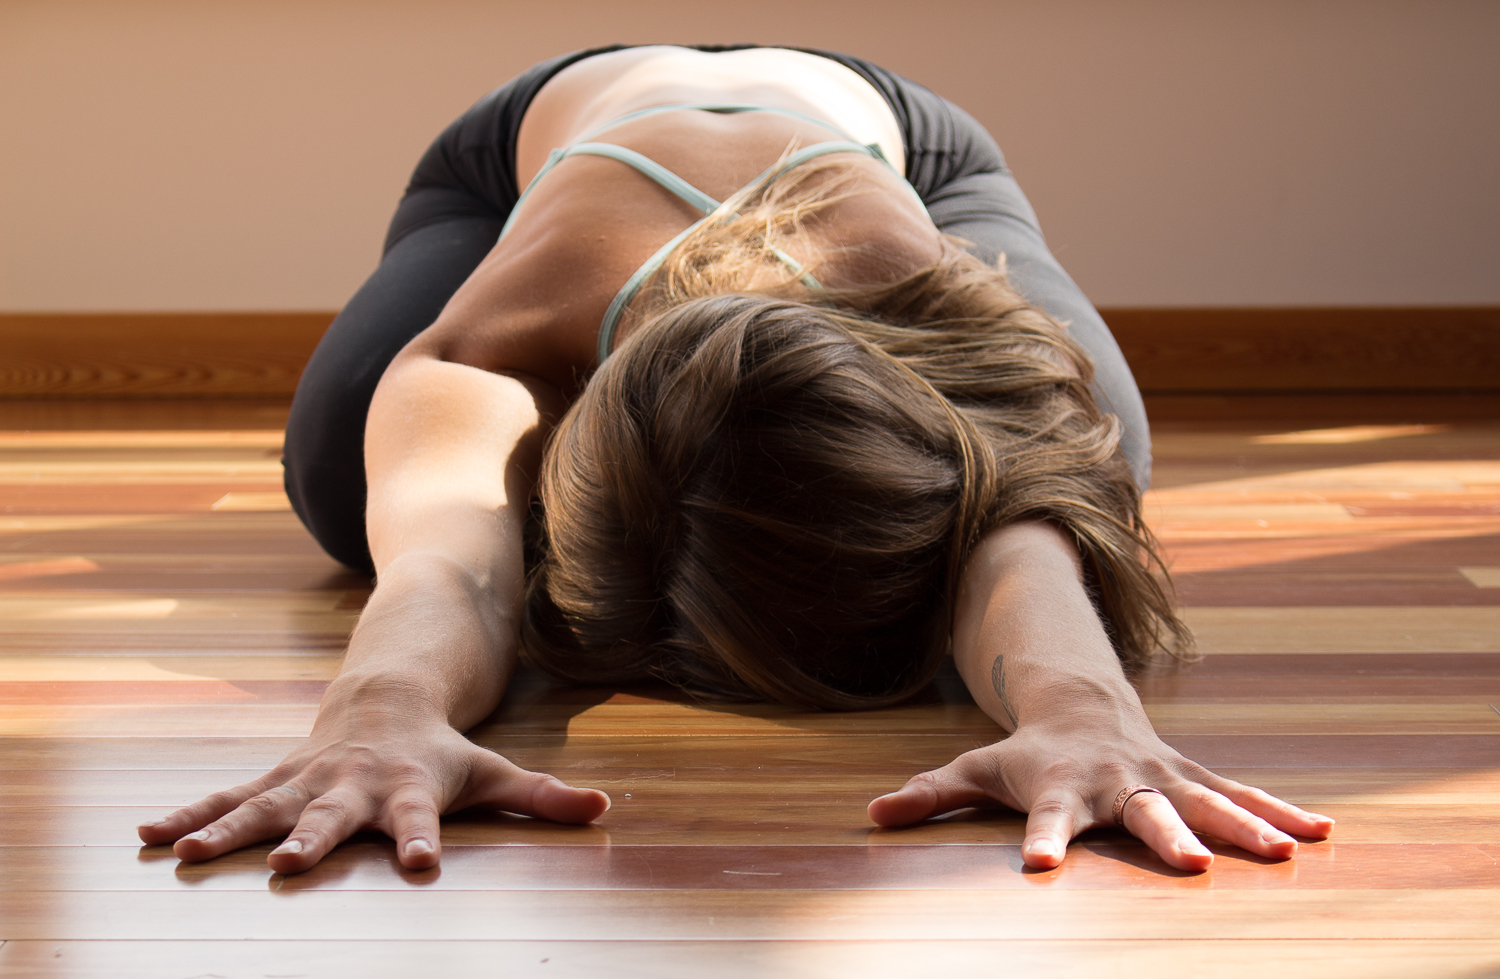
Pose, or Asana Child's Pose bah-lah-sah-nah

Mmm. Child's Pose.
Don't you just love it when your teacher says those words, offering you the chance to retreat inside, to turn inwards, to shut off all external noise and simply breathe? Child's pose, or Balasana, is frequently offered as a break within sequences, a time to re-establish steady breath, calm the heart rate, or return to intention if we've gravitated away from what we've set out to do.
Why is child's pose so grounding and calming?
- First of all, the shape of the spine in a child's pose mimics the shape of the spine in a fetal position—and our time in utero was, for most of us, the most stress-free, comforting, and grounded environment we've ever known. It's a gentle reminder to our bodies, and then our minds, to return to that calm, quiet state.
- Secondly, all forward folds are—in their physical nature—calming and quieting as our bodies are literally turning in towards themselves. The anatomical action of folding our bellies, chests, and faces into our legs—or in this case, the floor—seals us away from whatever is going on externally so we can only look at ourselves.
- Further, the action of resting the forehead down on something (the earth, stacked fists, a block) gently stimulates the vagus nerve. The vagus nerve helps to regulate the parasympathetic nervous system (the part that allows us to rest and relax), and in doing so it naturally lowers our heart rate, blood pressure, lessens tension and the stress hormone cortisol. That's why child's pose is also an excellent bed-time posture!
Balasana may help…
- Opens through your hips, thighs, and ankles
- Open the shoulders (especially in the traditional variation)
- Calm anxiety, soothe stress, and relieve fatigue
- Help move your nervous system into a more relaxed state

So, how do I get there?
- From Downward Facing Dog, lower your knees down, about mat-distance apart.
- Touch your toes together, and rest your seat back on your heels.
- Fold your torso forward. Let your belly rest in between your thighs.
- Extend your arms forward, palms facing down.
- Find someplace for your forehead to rest—if the ground is not available, you can use a block, a folded blanket, or even stack your palms or your fists.
- Breathe.
We hope this helps you better understand balasana, or child's pose. Please feel free to comment on our Facebook with any further questions. And let us know if you have something you would like to see featured in Foundation Friday!

Foundation Friday: Yoga for Better Sleep

This post is an instalment in a series that delves into the basics of yoga—looking at its postures (asana), breath (pranayama), philosophy, and all the other essentials—giving you the foundations upon which to build a solid practice. Today's focus is a little bit different—we're looking at how yoga can be beneficial in sleep. Because what could be more foundational for your yoga practice, your day—your life!—than a good night's rest?!
Foundation Friday: Yoga for Better Sleep
We all know the symptoms—dark half-moons under the eyes, lion-sized yawns, a lowered level level of alertness. If you've ever spent a night—or a string of them—tossing and turning, clock-checking, and worrying yourself awake, you're certainly not alone. According to the CHFA, one in seven Canadians have insomnia, or trouble falling asleep or staying asleep. And sleep deprivation is one of the leading causes of stress among American adults. As anyone who's spent a night sleepless in bed knows, counting sheep may be a somewhat entertaining attempt to lull yourself into a sweet slumber—but it's not always the most effective.

Bed-time yoga has been proven as an effective method of lessening the time it takes to fall asleep, and lengthening the time it takes to stay asleep—so much so, that even the U.S. Department of Defense has been using a yoga nidra derivative to help treat its soldiers sufferrering from Post-Traumatic Stress Disorder—an ailment that shares similar symptoms with insomnia, like anxiety, or the inability to sleep at night. While sun salutations and vinyasa are not particularly recommended, some gentle, calming yoga postures—done next to, or even right in your bed may help to soothe your mind and body into a sleep-state. Check out our top five yoga postures to help with sleep, below.
You'll notice that this list includes plenty of forward folds—forward folds, or extension promote a turning inwards, helping to rest and soothe the brain. Forward folds stimulate a cooling sensation in the body, and also help the digestive system to assimilate whatever hasn't yet been digested, whether physically or metaphorically.
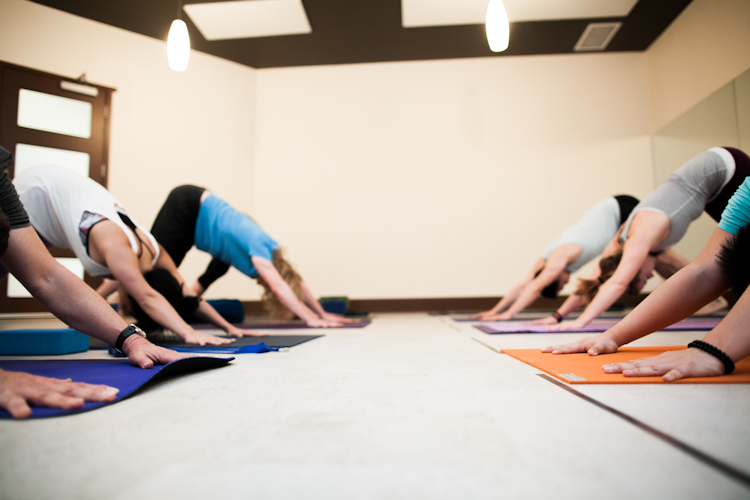
1.Downward Facing Dog, or Adho Mukha Svanasana
 Start from all fours, or a Tabletop position with your wrists outer-shoulder distance apart and your knees under your hips. Tuck your toes under, and press your hips skyward. You might need to bend one knee, and then the other to find some space in your back body to make this posture more comfortable. Bend both knees, and send your belly back towards your thighs. Lengthen your ears away from your shoulders.
2. Seated Forward Fold, or Paschimottanasana
 Sit up with your legs extended in front of you. Remove the flesh from underneath your sit bones by manually sliding it out from underneath your seat. Extend your heart forward towards your legs, and then fold forward. Relax your arms beside your feet or legs and let your head be heavy. Use the physical feeling of turning inward to help guide your mind inward as well—turning your thoughts off from the day behind or ahead of you, and instead focusing on calm breath and the physical sensations you feel inside your body.
3. Supine Twist, or Supta Matsyendrasana
 Bend your knees, scoot your hips slightly over to one side, and then lower your legs to the opposite side of your hips. This should help your hips to stack over top of each other. Turn your head opposite your legs if it's okay for your neck. If your knees are lifted uncomfortably away from the floor or your bed, you might support them with a blanket or pillow (bonus since they're so close!). Again, breathe deeply into your belly to invite a gentle compression into your internal organs, facilitating digestion both physically and metaphorically—helping yourself to integrate the happenings of your day so that you can rest and prepare yourself for the next. This posture may also help to alleviate any back and neck discomfort that prevents you from falling asleep.
4. Child's Pose, or Balasana
 Fold your torso forward between your legs and allow your forehead to rest, on either your bed, or stacked palms or fists. Take slow, deep belly breaths. If you like, you can massage your brow by gently rocking your head from side to side.
5. Corpse Pose, or Savasana

Set yourself up into a final resting posture—you might try lying down with your arms right alongside your body and feet hip-distance, or maybe you feel more comfortable extending your limbs further away from your torso. Once you're completely comfortable and at ease, try a yoga nidra technique:
Work through your body slowly, one piece at a time—draw all of your awareness to that part, starting at your feet. Notice the way your feet feel, and if there is any tension or muscular engagement in your toes, the balls of your feet, your arches, your heels, your ankles. Consciously relax that part of your body, using your long, drawn-out exhales to soften. Work your way up through your legs, your arms, your torso, and your head. Once you've covered all of the areas of your body—if you've made it through all of them without dozing off!—notice the way you feel now, and see if you can tell your mind to relax in the same way you have your body.
Use these postures alongside a deepened, calm breath. If thoughts are giving you anxiety, or preventing you from falling into a sleepy state, you can try writing them down in a bed-side journal, or try to let them pass by you without getting attached. If these postures aren't enough, you might try making some small lifestyle changes—like avoiding caffeine after lunch, turning all your screens off at least an hour before bed, or settling into a nighttime ritual to help tell your body it's time to rest.
Let us know what's helped, and what hasn't in your journey to easy rest. Sweet dreams, yogis!

Foundation Friday: Anjaneyasana

This post is an instalment in a series that delves into the basics of yoga—looking at its postures (asana), breath (pranayama), philosophy, and all the other essentials—giving you the foundations upon which to build a solid practice. Today's focus will be on Anjaneyasana, or Crescent Lunge Pose.
Foundation Friday: Anjaneyasana
Pose, or Asana "Crescent Lunge Pose" ahn-jahn-eh-yass-a-nah

Anjaneyasana, or Crescent Lunge Pose is a posture you'll find in nearly every yoga class. You might find yourself in an Anjaneyasana variation with your back knee lifted or lowered, toes tucked under or not, perhaps in a slight back bend, or with your arms reaching back like you're a runner about to leap off your starting block. Lunges strengthen and stretch the feet, legs, hips, core, back, and even the shoulders and arms—this posture gets your whole body involved!
Anjaneyasana may help…
- Relieve symptoms of sciatica
- Build stabilizing muscles in your legs
- Open through your hips, shoulders, groin, armpits, and neck
- Strengthen your thighs, calves, arches, back, shoulders, and arms

So, how do I get there?
- From Adho Mukha Svanasana (Downward Facing Dog), step your right foot up in between your hands. Or, from Tadasana (Mountain Pose), bend your knees and take a long step back with your left leg. Ensure your legs are hip-distance apart.
- Lunge into your front leg—bend your front knee to a 90-degree angle, while ensuring your stance is long enough that your front ankle lines up directly underneath your knee.
- Choose to lower your back knee (low lunge), or keep it lifted (high lunge). *If lowering your back knee bothers your knee joint, you can place a foam composite block underneath that knee, or fold your mat over to offer the joint extra padding.
- Press your front foot down strongly to lift your torso so that it's vertical, stacking your shoulders over your hips.
- Squeeze your inner thighs towards each other to press your right hip back and your left hip forward, so your hips are square.
- Root your tailbone, but lengthen up throughout your spine to the crown of your head.
- Reach your arms skyward, slide your shoulders back and down your spine, and fan your fingers out wide.
We hope this helps you better anjaneyasana, or crescent lunge pose. Please feel free to comment on our Facebook with any further questions. And let us know if you have something you would like to see featured in Foundation Friday!

Foundation Friday: Downward Facing Dog
This post is an instalment in a series that delves into the basics of yoga—looking at its postures (asana), breath (pranayama), philosophy, and all the other essentials—giving you the foundations upon which to build a solid practice. This post focuses on the ubiquitous downward facing dog.
Foundation Friday: Downward Facing Dog
Pose, or "Asana" Downward Facing Dog, or “Adho Mukha Svanasana” odd-oh mook-ah shvah-nass-ah-nah (not to be confused with savasana)

Why do we practice downward facing dog?
Downward dog is probably one of the most prevalent of all yoga postures. Though it may not feel like one when you first begin practicing, downward facing dog is actually a resting pose, and is often offered as a break between sequences, or as a starting and finishing point in a flow, or vinyasa. This pose will likely be taught in your first-ever beginner's class, and will carry you through as you advance your practice—downward dog is a quintessential pose, so it's important to get your alignment, er... down!
Downward dog may help…
- Calm the mind, relieving stress and mild depression
- Energize your body
- Stretch your shoulders, hamstrings, calves, arches, and hands
- Strengthen your arms and legs, which acclimatizing you to weight-bearing in your arms
- Improve digestion
- Offer relief for sinus pain, headaches, insomnia, back pain, and fatigue
- Ease conditions of menopause, high blood pressure, asthma, flat feet, and sciatica, and prevent osteoporosis
Traditional Chinese Medicine and acupuncture tend to favour Downward Facing Dog for its activation and extension of the Bladder Channel, the longest channel in the body. According to their perspective, elongating the spine throughout this posture aids in strengthening immunity, among a host of other benefits.

How do I get there?
- Start from a table top position, on your hands and knees. Place your hands slightly wider than shoulder distance apart and spread your fingers wide.
- Turn your hands so that the space between your pointer finger and your middle finger points to the top of your mat.
- Press down through the four corners of your hands, especially the mound of your thumb and pointer finger, while gripping your mat with your fingertips.
- Tuck your toes under, and press your hips up so that your body looks like an inverted pyramid from the side.
- Squeeze your forearms towards each other, and roll your upper arms away from each other.
- Ensuring your feet are hip-distance apart, take a soft bend into your knees and press your heart back towards your thighs.
- Roll your inner thighs back and wide behind you.
- Tilt your sitting bones skyward, and draw your tummy in towards your spine.
- Hug your shins towards each other, and press your heels down towards your mat (but it's okay if they don't touch!)
- Look between your feet, shins, thighs, or upwards at your belly.
If this position is uncomfortable, you can:
- Place your hands on blocks if your shoulders are quite tight
- Prop a towel, rolled mat, or some small sort of padding underneath your palms to alleviate pressure on your wrists
- Take a bigger bend into your knees if your legs are tight
- Support your head with a bolster or a block
- Or, start from standing with a wall or chair in front of you, then bend at your waist and press your palms into a wall or chair instead of the floor. Progress by walking your hands lower towards the earth as the posture becomes more accessible.
We hope this helps you better understand the concept of downward facing dog. Please feel free to comment on our Facebook with any further questions. And let us know if you have something you would like to see featured in Foundation Friday!

Getting Rooted with Muladhara


Our thoughts and emotions are vibrations that move like a current through our subtle body. Think of the physical body as what you can touch and see and your energy body as your subtle body: your vibration. Chakras are points along the subtle body located at the physical counterparts of the major arteries, veins and nerves. The Sanskrit word chakra means "wheel" or "turning" and the yogic concept refers to a vortex or whirlpool of energy. There are seven main chakras in the body, each governing a different host of connections to one's health and harmony with self and environment.
Each of the seven chakras are governed by spiritual laws, principles of consciousness that we can use to cultivate greater harmony, happiness, and wellbeing in our lives and in the world.
- Deepak Chopra
Chopra shares the following information on our first chakra:

The First Center: The Root Chakra
The root chakra, known in Sanskrit as muladhara, is located at the base of the spine. It governs your most basic survival needs. When this chakra is clear and energy flows through it freely, we feel secure and confident that we can easily fulfill our needs. However, blockage in this area can cause us to feel anxious and worried.
The spiritual Law of Karma governs the first energy center. On the physical plane, every action you perform results in a corresponding reaction. To maximize the possibility that your actions generate evolutionary reactions, you can use your body as a choice determining instrument.
Consider the possibilities in front of you and listen to signals from your body. These sensations generating from the root chakra are either comfortable or uncomfortable. Your body evaluates every possible decision in terms of its likelihood to meet your needs for safety or increase the level of threat you experience.
The first chakra, which connects you with the earth, provides essential information as to the potential nourishment or toxicity that is available to you as a result of the actions you are taking.
If you are interested in chakra work and knowing more about these energy systems in the body, join us tomorrow, March 8th, at Yogalife Studios South for the first session of Asana & Acupuncture: The Root Chakra. We will draw awareness to the energy center, move through a stimulating practice, and rebalance with acupuncture.
Muladhara Chakra is the most instinctual of all the chakras and our survival center, and the center that connects us to the earth and to our ancestral past. When excessive, we often feel egotistical, a need to be in control, and a need to possess. When blocked, often a lack of confidence is present, or feelings of no direction or purpose.
Through an asana practice, we will move through postures that directly stimulate and work to balance out our root chakra. After finding a deep awareness of that energy center, we will settle into an extended savsana, where acupuncture points directly linked to our first chakra, namely the conception vessels, governing vessel, and kidney & bladder meridians will be administered.
Categories
- Wellness 241
- Zen Habits & Inspiration 100
- Yoga Specific 54
- Yogalife Workshops, Retreats & Trainings 37
- What's Going On 35
- Workshops 34
- Anatomy & Information 30
- Injury Prevention & Health 30
- Foundation Friday 25
- Instructor Stories 22
- Studio Information 17
- Community Event 15
- Yogi of the Month 13
- Recipe 11
- Staff Adventures & Journeys 10
- YEG Highlight 8
- Yogalife Classes 7
- Karma Program 5
- Member Stories 5
- Registered Classes 4
- Physical Health 3
- Curated Playlists 2
- Mental Health 2
- Classes 1
- Pregnancy & Family 1
- Prop Specific 1
- Relaxation 1